Overview
Around a year ago Github released a continuous integration (CI) service called Github Actions. While it is nice to have a CI service in the same place as your code, there are fewer guides about how to use it than there are for more established services like Travis CI or CircleCI.
In particular, there are no tutorials of how to use Github Actions in repos that manager their dependencies with Conda environments. There are several actions in the Marketplace that are designed to perform various tasks with Conda, but Miniconda is already installed on Github Actions runners so they aren’t strictly necessary.
This post has three parts. First it explains the different parts of a Github Action and what they do. Then it gives examples of how to use Github Actions to run tests on both Windows and Ubuntu virtual machines. Finally it discusses when and how to use actions from the marketplace instead of writing all of the logic yourself. If you are unfamiliar with continuous integration, or want a refresher, you may want to start here.
Anatomy of a Github Action
Github does a great job of explaining how to set up a starter workflow.
If you’re unfamiliar with how to set up an action, start there.
The tl;dr of it is that you add the file <project_root>/.github/workflows/<workflow_name>.yml to your repository.
The only issue is that they don’t currently explain much of the syntax, they just refer you to templates or the full reference document.
This section lists explains the basic syntax of an action line by line.
Example Github Action Syntax
name: Python Package Using Anaconda
At the top level, the name command sets the name of your whole workflow.
In the Actions tab on Github, it looks like this:
name: Python Package Using Anaconda

on: [push]
The on keyword tells the workflow when to run.
There are a ton of different fields you can provide here,
but the most common two are push and pull_request.
You can also customize which branch the workflow is run on based on the event that triggered it.
For more information on that, there is a helpful page in the Actions reference.
name: Python Package Using Anaconda

on: [push]

jobs:
  build-linux:
We have now entered the jobs block, where most of the substance of the workflow lives.
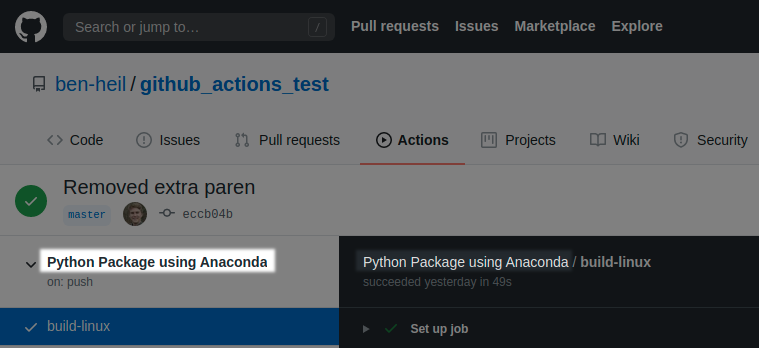
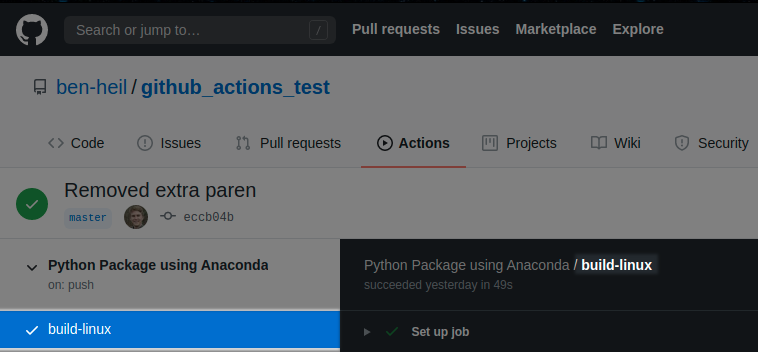
The only job we’re running in this example has the id build-linux.
It’s worth noting that the id describes what the job does instead of changing anything about the workflow.
The image below shows the locations where the job id shows up in the Actions tab on Github.
name: Python Package Using Anaconda

on: [push]

jobs:
  build-linux:
    runs-on: ubuntu-latest
The runs-on field is required for each job, as it tells the runner which operating system to use.
The typical options are windows-latest, ubuntu-latest, and macos-latest, though there are multiple OS versions available.
You can also run the workflow on your own server if you want to test more operating systems or exceed Github’s workflow usage limits.
name: Python Package Using Anaconda

on: [push]

jobs:
  build-linux:
    runs-on: ubuntu-latest

    steps:
    - uses: actions/checkout@v2
Now we’re in the steps block.
In Github Actions a step is a single process run sequentially with other steps.
Our first step is actually a uses statement, which is a step that runs another action.
The syntax for uses statements is uses: <repo>/<action_name>@version, so we know that this action is from the official Github Actions repo.
In this case, checkout adds the repository our action is being run on to the virtual machine so we can work with the repo’s files.
name: Python Package Using Anaconda

on: [push]

jobs:
  build-linux:
    runs-on: ubuntu-latest

    steps:
    - uses: actions/checkout@v2
    - name: Set up Python 3.8
      uses: actions/setup-python@v2
      with:
        python-version: 3.8
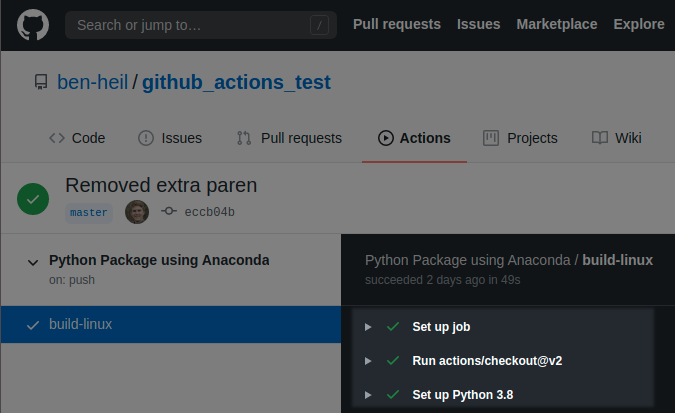
Another uses statement!
This one has its own name, which changes how it’s displayed on Github.
It also introduces a new keyword, with, which is used to pass key-value pairs as arguments into the action.
This istance of with tells setup-python to set up Python 3.8 specifically.
The names of the two steps so far can be seen below, along with a default step that sets up the runner.
name: Python Package Using Anaconda

on: [push]

jobs:
  build-linux:
    runs-on: ubuntu-latest

    steps:
    - uses: actions/checkout@v2
    - name: Set up Python 3.8
      uses: actions/setup-python@v2
      with:
        python-version: 3.8
    - name: Install dependencies
      run: |
        # $CONDA is an environment variable pointing to the root of the miniconda directory
        $CONDA/bin/conda env update --file environment.yml --name base
The first thing to notice is the run keyword, which executes commands in a shell.
Which shell is being run depends on the operating system for the job, though it can be specified manually with the shell keyword.
Because this action uses Ubuntu, the shell defaults to bash.
This is also the first Conda specific step.
The CONDA environment variable is present in all environments to point to the Miniconda root directory for the virtual machine.
Normally we’d use something like conda env create -f environment.yml to install an environment from a file.
Unfortunately, environment variables don’t persist between steps in a workflow, which breaks some things in Conda.
Installing the environment’s packages into the base environment avoids this issue because it makes the packages available by default.
name: Python Package Using Anaconda

on: [push]

jobs:
  build-linux:
    runs-on: ubuntu-latest

    steps:
    ...
    - name: Lint with flake8
      run: |
        $CONDA/bin/conda install flake8
        # stop the build if there are Python syntax errors or undefined names
        $CONDA/bin/flake8 . --count --select=E9,F63,F7,F82 --show-source --statistics
        # exit-zero treats all errors as warnings. The GitHub editor is 127 chars wide
        $CONDA/bin/flake8 . --count --exit-zero --max-complexity=10 --max-line-length=127 --statistics
This step runs the flake8 linter to check the python code in the directory. The first line installs flake8 into the base environment. The next line throws errors for specific code issues, then the following line runs the full linter to print any style issues.
If this were a normal machine you’d be able to call flake8 here without specifying a path.
Because Github Actions runners ignore shell profiles, you have to specify the path from the Conda directory instead.
Alternatively you can use shell: bash -l {0} for the step which should make the path
to flake8 available.
name: Python Package Using Anaconda

on: [push]

jobs:
  build-linux:
    runs-on: ubuntu-latest

    steps:
    ...
    - name: Test with pytest
      run: |
        conda install pytest
        $CONDA/bin/pytest
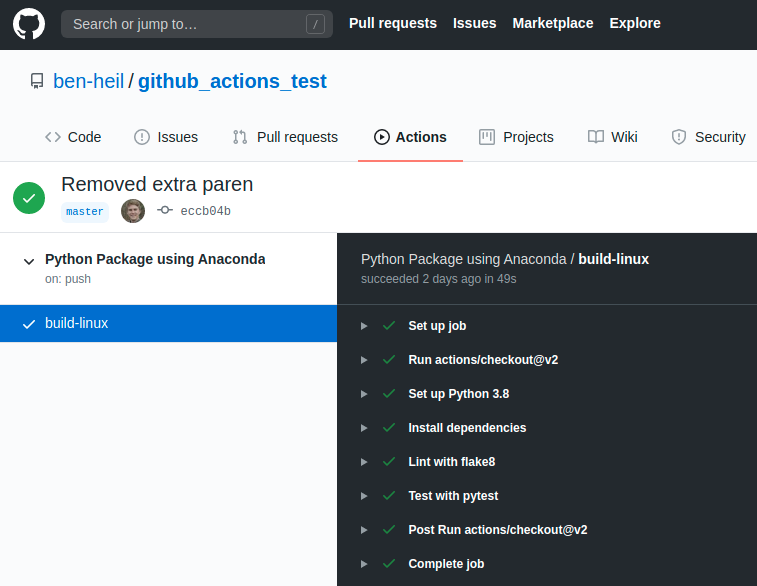
Finally, the last step installs and executes pytest to run any test cases in the repository. There’s nothing new in this step, so the section will conclude with the full image of the action’s run.
Examples of Conda Actions
This section contains basic Conda actions that can be used in Ubuntu/Macos and Windows. I wrote them, but a lot of the idiosyncracies and pieces of the implementation come from information people dug up in this thread. If you’re looking to write custom workflows, you’ll probably want to read through the thread to better understand what’s going on.
Ubuntu Action
name: Python Package Using Anaconda

on: [push]

jobs:
  build-linux:
    runs-on: ubuntu-latest

    steps:
    - uses: actions/checkout@v2
    - name: Set up Python 3.8
      uses: actions/setup-python@v2
      with:
        python-version: 3.8
    - name: Install dependencies
      run: |
        # $CONDA is an environment variable pointing to the root of the miniconda directory
        $CONDA/bin/conda env update --file environment.yml --name base
    - name: Lint with flake8
      run: |
        $CONDA/bin/conda install flake8
        # stop the build if there are Python syntax errors or undefined names
        $CONDA/bin/flake8 . --count --select=E9,F63,F7,F82 --show-source --statistics
        # exit-zero treats all errors as warnings. The GitHub editor is 127 chars wide
        $CONDA/bin/flake8 . --count --exit-zero --max-complexity=10 --max-line-length=127 --statistics
    - name: Test with pytest
      run: |
        conda install pytest
        $CONDA/bin/pytest
The action above is based off the python-package github action.
It is also listed in the Github starter workflows directory as python-package-conda.
Since it’s discussed in depth in the first section, I’ll avoid going into too much detail here.
Windows Action
name: Github Actions in Windows
jobs
  build-windows:
    runs-on: windows-latest

    steps:
    - uses: actions/checkout@v2
    - name: Set up Python
      uses: actions/setup-python@v2
      with:
        python-version: 3.8
    - name: Install dependencies
      run: |
        C:\Miniconda\condabin\conda.bat env update --file environment.yml --name base
        C:\Miniconda\condabin\conda.bat init powershell
    - name: Lint with flake8
      run: |
        # Activate the base environment
        C:\Miniconda\condabin\conda.bat activate base
        C:\Miniconda\condabin\conda.bat install flake8
        # stop the build if there are Python syntax errors or undefined names
        flake8 . --count --select=E9,F63,F7,F82 --show-source --statistics
        # exit-zero treats all errors as warnings. The GitHub editor is 127 chars wide
        flake8 . --count --exit-zero --max-complexity=10 --max-line-length=127 --statistics
    - name: Test with pytest
      run: |
        # Activate the base environment
        C:\Miniconda\condabin\conda.bat activate base
        C:\Miniconda\condabin\conda.bat install pytest
        pytest
This action is a Windows implementation of the action above.
While the steps and the end results are the same, the implementation is fairly different.
The differences start at the first line of Install dependencies when it becomes apparent that the shell being used is PowerShell instead of bash.
There is also an added init powershell line.
This line tells the virtual machine to look for Conda information when loading new shells (as it does at the start of each step).
Now that PowerShell knows where to look for Conda environments, the next steps are able to activate an environment, install a package, and use the package without a path from the Conda directory.
The final difference is that an absolute path to Conda is used instead of a relative path from the CONDA environment variable.
The CONDA variable still exists in Windows, I just don’t know PowerShell well enough to use it.
Using Actions from the Marketplace
There are a number of actions in the marketplace that set up Conda environments. Now that you’ve seen the complexity of coordinating Conda paths on the virtual machines though it’s apparent that a marketplace action might be useful. As far as I can tell, the best one is setup-miniconda. There are examples of how to invoke it on their main page but not a comparable workflow, so I went ahead and added one below.
The setup-miniconda action installs Miniconda each time it is run, which I expected to negatively impact performance. To measure the performance differences, I set up a simple repository then ran my example actions above against the example action below. Surprisingly, setup-miniconda ran around as fast as the example actions. I imagine setup-miniconda would work even better in a more complicated test setup since it has options for caching libraries and using the mamba package manager.
If your use case for Github Actions is limited in scope or you have a strong aversion to external dependencies in your code, then you may want to avoid marketplace actions. Otherwise using something like setup-miniconda will likely make your life easier.
Marketplace Example
name: Use Setup-Miniconda From Marketplace
on: [push]

jobs:
  miniconda:
    name: Miniconda ${{ matrix.os }}
    runs-on: ${{ matrix.os }}
    strategy:
        matrix:
            os: ["ubuntu-latest", "windows-latest"]
    steps:
      - uses: actions/checkout@v2
      - uses: conda-incubator/setup-miniconda@v2
        with:
          activate-environment: test
          environment-file: environment.yml
          python-version: 3.8
          auto-activate-base: false
      - shell: bash -l {0}
        run: |
          conda info
          conda list
      - name: Lint
        shell: bash -l {0}
        run: |
            conda install flake8
            python -m flake8 . --count --select=E9,F63,F7,F82 --show-source --statistics
            python -m flake8 . --count --exit-zero --max-complexity=10 --max-line-length=127 --statistics
      - name: Run pytest
        shell: bash -l {0}
        run: |
            conda install pytest
            pytest
Conclusion
Hopefully this post was helpful! If you’re interested in learning more about how Github Actions work, I highly recommend taking a look at the reference.
As always, if you notice anything wrong or have any questions, let me know about it on Twitter.
Acknowledgements
A huge thanks to the people in this thread, without whom I probably couldn’t have figured out how to get Conda working in Actions. This post is funded in part by the Gordon and Betty Moore Foundation’s Data-driven Discovery initiative through grant GBMF4552.